Water can damage a home’s structure and appearance, especially in moisture-prone areas like bathrooms, kitchens, and basements. Ignoring this can lead to mold, warping, and peeling paint, resulting in costly repairs. Prioritizing functionality and durability when designing these spaces is essential for a long-lasting home.
Identifying the Splash Zones
Before you pick out tile samples or paint swatches, you need to map out the moisture levels in your home. This is a crucial first step when planning bathroom remodeling for homes in Layton. Not all damp areas are created equal, and understanding the difference can save you money and headaches.
High-Humidity vs. Direct Water Exposure
There is a significant difference between a room that gets humid and a surface that gets wet.
- Direct Wet Zones: These are areas like shower stalls, bathtub surrounds, and kitchen backsplashes directly behind the sink. These surfaces need materials that are essentially waterproof, not just resistant.
- High-Humidity Zones: Bathrooms with showers, laundry rooms, and sometimes kitchens fall into this category. The air carries moisture that can settle on walls, ceilings, and cabinetry, leading to mold growth if materials are porous.
- Damp Zones: Basements and mudrooms often suffer from rising dampness or exposure to wet gear. The moisture here can be insidious, seeping up from the ground or coming in through wet shoes and coats.
Recognizing these distinctions helps you allocate your budget. You might splurge on impervious porcelain for a shower wall but save money with moisture-resistant drywall in a laundry room.
Key Design Considerations
Material selection is only half the battle. The way you design the space influences how moisture accumulates and evaporates. Smart design promotes airflow and minimizes places where water can sit stagnant.
Ventilation is Non-Negotiable
The best defense against moisture damage is moving wet air out of the house. In bathrooms and laundry rooms, an appropriately sized exhaust fan is critical. For kitchens, a range hood that vents to the outside helps remove steam from cooking. When designing the layout, ensure these fans are positioned near the moisture source—directly above the shower or stove.
Surface Slope and Drainage
In direct wet zones, gravity is your friend. Shower floors must have the correct pitch to ensure water drains immediately rather than pooling. Similarly, vanity tops and kitchen counters should be installed with precision to prevent water from collecting at the back edge near the wall.
Minimizing Grout Lines
Grout is often the weak link in a tiled surface. It is porous and prone to cracking, which allows water to seep behind the tile. In extremely wet areas, consider using large-format tiles. Larger tiles mean fewer grout lines, reducing the surface area available for mold to take root and water to penetrate.
Selecting Moisture-Resistant Materials
Now comes the fun part: choosing the finishes. The market is full of innovative materials that mimic the look of wood, stone, and fabric while offering superior water resistance.
Flooring Options
Floors take the brunt of spills and leaks. Here are the top contenders:
- Porcelain and Ceramic Tile: The gold standard for wet areas. Porcelain is denser and less porous than ceramic, making it ideal for bathrooms. It is virtually waterproof and extremely durable.
- Luxury Vinyl Tile (LVT) or Plank (LVP): A fantastic, budget-friendly alternative to wood. It is 100% waterproof and can mimic the warmth and texture of hardwood without the risk of warping.
- Natural Stone: Marble, granite, and slate are beautiful but require maintenance. Stone is naturally porous and must be sealed regularly to prevent water staining and damage.
- Concrete: Polished concrete is gaining popularity for its industrial chic look. When properly sealed, it is incredibly resistant to water and very easy to clean.
Wall Finishes
Walls in moisture-prone rooms need more than standard drywall.
- Greenboard (Moisture-Resistant Drywall): This is a specially treated drywall with a wax-coated paper facing that resists moisture. It’s a minimum requirement for bathroom walls outside the shower area.
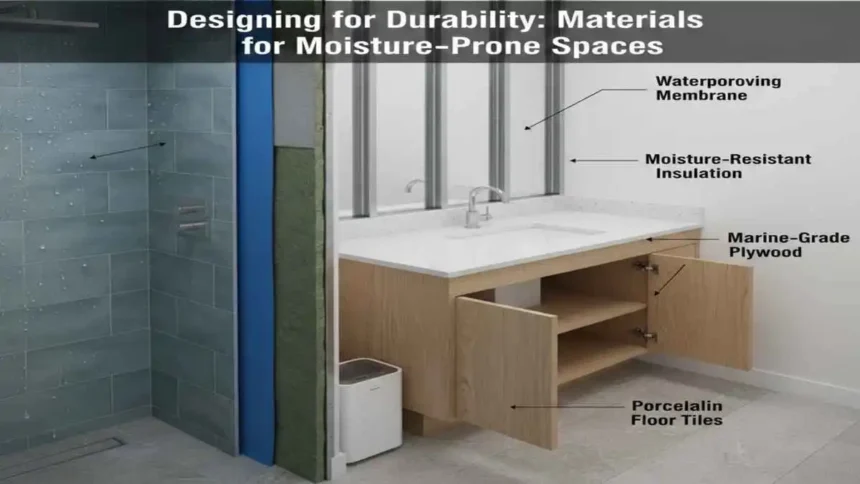
- Cement Board: For shower walls or behind tub surrounds, cement board is essential. It provides a stable, water-resistant backing for tile that won’t degrade if a little moisture gets through.
- Semi-Gloss or Satin Paint: Avoid flat or matte finishes in bathrooms and kitchens. Glossier sheens repel moisture better and are easier to wipe down. Look for paints specifically formulated with antimicrobial additives to inhibit mold growth.
Cabinetry and Countertops
- Countertops: Quartz is a top choice because it is non-porous and requires no sealing, unlike granite or marble. Solid surface materials are also excellent as they are seamless and non-porous.
- Cabinetry: In high-humidity areas, solid wood can expand and contract, leading to warped doors and cracking paint. Thermofoil or melamine laminates over marine-grade plywood are often more stable choices for bathroom vanities.
Practical Tips for Installation and Maintenance
Even the highest quality materials will fail if installed incorrectly. Attention to detail during the construction phase is paramount.
Seal It Tight
Silicone caulk is the barrier between your dry walls and wet fixtures. Ensure a high-quality, mold-resistant silicone is used around tubs, sinks, and showers. Check these seals annually; if the caulk is peeling or cracking, replace it immediately.
Waterproofing Membranes
For tiled showers, the tile itself is not the waterproofing layer—the membrane behind it is. ensure your contractor uses a liquid waterproofing membrane or a sheet membrane behind the tile. This is the ultimate safety net against structural water damage.
Routine Maintenance
Maintenance in wet rooms is about vigilance.
- Wipe Down: Squeegee shower glass and tile after every use to prevent soap scum buildup and mold.
- Check for Leaks: Periodically check under sinks for drips. A small leak can rot a cabinet floor before you even notice it.
- Run the Fan: Leave the exhaust fan running for at least 20 minutes after a shower to fully clear the humidity from the room.
Conclusion
Designing for moisture-prone spaces requires blending style with utility. By understanding the needs of wet zones, prioritizing ventilation, and choosing robust, non-porous materials, you can create durable and beautiful spaces.